5 minutes
Iron Shulker Madness
Iron Shulker Madness - A solution to over-flowing double-chests of Iron Blocks.
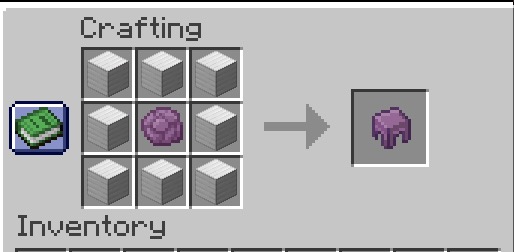
This plugin adds a recipe to our Minecraft server that uses Iron Blocks and Popped Chorus Fruit to create shulker shells. Sure, this isn’t the most fare trade in the game, but really helped out our little family server so that we can still enjoy the game with limited play time.
But Why?
So… my son and I have a local Minecraft server that we host at home. We’re using PaperMC along with GeyserMC so that he can play on the same server as my Java client with his Nintendo Switch. As with all good Minecraft servers, we have a simple Iron Farm that was built at spawn. I didn’t think it would run when we’re not logged into the server, but low and behold, it does. It produces around 2 Double Chests of Iron Blocks every 3 days, so, we have a lot of iron. More than we’ll ever use, so I wanted to come up with a fair way to use up the iron and trade it for something more useful.
So, I started looking into creating custom recipes for Minecraft servers, and I came across Brian Gershon’s Minecraft-Plugin template. From there, I cloned it and read a bit into the Spigot/Bukkit API to find out how to add Recipe’s. My son and I decided that 8 Iron Blocks and 1 Popped Chorus Fruit was a reasonable trade for something we were really in need of - Shulker Shells.
Sure, we could have made a Shulker farm, but we don’t play a lot, but really wanted to experience the end-game, so this was the solution that we came up with.
The Code
package com.hacdan.IronShulker;

import org.bukkit.plugin.java.JavaPlugin;
import org.bukkit.Material;
import org.bukkit.inventory.ItemStack;
import org.bukkit.inventory.ShapedRecipe;
import org.bukkit.Bukkit;
import org.bukkit.NamespacedKey;

public class App extends JavaPlugin {
    @Override
    public void onEnable() {
        getLogger().info("Loading the Iron Shulker Recipe");
        ItemStack result = new ItemStack(Material.SHULKER_SHELL);
        NamespacedKey key = new NamespacedKey(this, this.getDescription().getName());
        ShapedRecipe recipe = new ShapedRecipe(key, result);

        recipe.shape("III", "IPI", "III");

        recipe.setIngredient('I', Material.IRON_BLOCK);
        recipe.setIngredient('P', Material.POPPED_CHORUS_FRUIT);

        Bukkit.addRecipe(recipe);
    }

    @Override
    public void onDisable() {
        getLogger().info("See you again, SpigotMC!");
    }
}
The How
First off, you’re going to need maven installed on your system. I’m on an M1 Macbook Air, so I used brew
brew install maven
If you’re on Linux, I’m sure it’s just an apt install away.
You’re also going to need a copy of JDK > 21 for your hardware from Oracle ’s website.
From there, you’re going to need to clone down the example plugin from Brian GerShon.
git clone git@github.com:briangershon/minecraft-plugin.git <plugin name>
Be sure to change <plugin name> to what you want your plugin to be called. It will make life much easier.
From the README, you’ll also want to do the following:
- Rename existing
demofolder atsrc/main/java/com/briangershon/demoto be your own, then search-and-replacecom.briangershon.demowith name of your package.App.javais where you’ll start adding your plugin logic. You’ll also want to update the log - Rename
com/briangershonfolder to your personal package name. Usually something likecom/<username> - Update
src/main/resources/plugin.ymland populate with the meta data for your plugin. - Update
pom.xmltop section to match your plugin, specifically<groupId>,<artifactId>, and<version>. Plus<dependency>section if you’re using a different Spigot version. You can find list of spigot versions at https://hub.spigotmc.org/nexus/content/repositories/snapshots/org/spigotmc/spigot-api/ .
After you’ve made your changes in App.java you can run mvn clean package to compile the package into a jar file in the ./target directory.
To ease the development cycle, I recommend also setting up a Development Server so you don’t have to transfer the jar to your server every time you want to test a change. To do this, you can download a copy of the Spigot
BuildTools.jar from here
. You’ll need to build the Spigot jar file, due to ToS restrictions.
java -jar BuildTools.jar --rev 1.21.5
Alternatively, you can download a copy of PaperMC from here . These are pre-built and usually a bit behind Spigot/Bukkit, but are pre-compiled.
Once downloaded, you’ll want to create a script for starting your server, so you don’t have to type out the java args every time.
#/usr/bin/env sh
java -Xms2G -Xmx2G -jar <Server.jar> nogui
Be sure to replace <Server.jar> with the name of the server you decided to go with. After starting the server, you’ll be requested to agree to the EULA.txt which requires you to open the EULA.txt and change the eula=falase to eula=true.
Go ahead and restart the server once you’ve made that change and it should have created a plugins directory. You’ll place the compiled plugin from the /target directory of your source code. I recommend creating a script to move this file, so you don’t have to write the cp or mv command arguments every time, to speed up the feedback loop.
deploy.sh
#!/usr/bin/env sh

cp ./target/<PluginName>.jar /path/to/mcserver/plugins/
Don’t forget to chmod +x deploy.sh after you create it.
That should get you going. I was surprised how little setup there was, but maven is really doing the heavy lifting here. Downloading the requird packages so your can compile your plugin against them and what not. Being that I haven’t worked with java in quite a while, it was refreshing, to say the least, to not have to write a lot of build logic.
With all that said, my son and I can now enjoy having as many shulker boxes as we need and can still spend time doing other things in life!
Until next time!